ECHO project - Practice at home before heading out into the field!
ECHO project - Practice at home before heading out into the field!
This advice should apply to almost any setup that you want to take outside. However, it is particularly true for the ECHO project's arrays.
These arrays are complex by nature, so if you find a solution, you should tear it down and rebuild it several times! Your setup doesn't have to be our solution. We show you our solutions to give you a starting point and some guide-lines. Nothing less, nothing more.
We have learned that this not only improves your setup skills, but also leads to better solutions that require less gear.
Remember!
YOU are the one who has to carry all the equipment to the recording location! And after the first hike with more than 20 kg in your backpack you will know exactly what we are talking about.
Our process of finding a good solution
It all starts with reading the provided documentation of the arrays. You should have a solid understanding what was the idea to set up an array this way.
Then we make some drawings. Meanwhile we have a set of rods, cubes, balls, rapid adapters and all that stuff, we use in Inkscape.
(You may use any other drawing software as well, it doesn't matter)
This is much more convenient and faster to find a first approach. Then write down a very first version of a shopping list and prepare the gear as noted.
Now it's "tinker-time". - Take your time, and pay close attention to the weight.
The arrays are spread out widely, so pay particular attention to the laws of leverage.
As the equipment we use is relatively lightweight, it has limited load-bearing capacity, and the arrays quickly push the material to its limits. So be careful!
We learned that the strings visible in the pictures we provide are a great help with this topic. However, this is not a silver bullet!
It always happens that something is forgotten about mounting earlier in the process. This is normal. It shouldn't bother you much. This happens often.
After setting up the array, take some pictures. Take pictures of the details, as well as of the array as a whole. Then, start taking it down again, documenting every step. Looking at the pictures in reverse order will give you a guide for setting up the array again. Regard this guide as a "living document." Each time you set up the array, you will most likely find ways to improve it and/or reduce the amount of gear used.
For example: We found that using nylon strings provides more stability to parts of the arrays with almost no additional weight. This allowed us to eliminate a heavy stand and use a lightweight carbon light stand instead. This alone saved us more than 3.5 kg!
Once you find a good solution you may start wondering how to connect the microphones with your reorders. But this is a different story with more articles.
You should also read:
ECHO project - Connecting Microphones to Recorders
ECHO Project - Connecting Microphones to Recorders When you come here from the former article, "ECHO project - Practice at home before heading out into the field!", you've come to the right place or the next step, just as you like. We use four-channel multicores…
Continue reading...ECHO project microphone arrays - Lessons learned
ECHO project microphone arrays - Lessons learned In this article, we will share links to things we learned while making recordings with the ECHO project's microphone arrays. This is a "living document," meaning it will grow over time. Please check back regularly to see if…
Continue reading...ECHO project - P3H Pyramid
ECHO project - P3H Pyramid This is also a very interesting microphone array of the ECHO project. Unfortunately, we can't replicate this array. We are sorry for saying so, but there is no way to make it happen. While it would be possible from a…
Continue reading...ECHO project - PAMA
ECHO project - PAMA Simon Ratcliffe supposed the PAMA array and it has some very interesting advantages. But let's Simon speak for himself: Objective: Stemming from orchestral film and game music, PAMA (Prototype Atmos Microphone Array) is an in-progress design that aims to extend traditional recording…
Continue reading...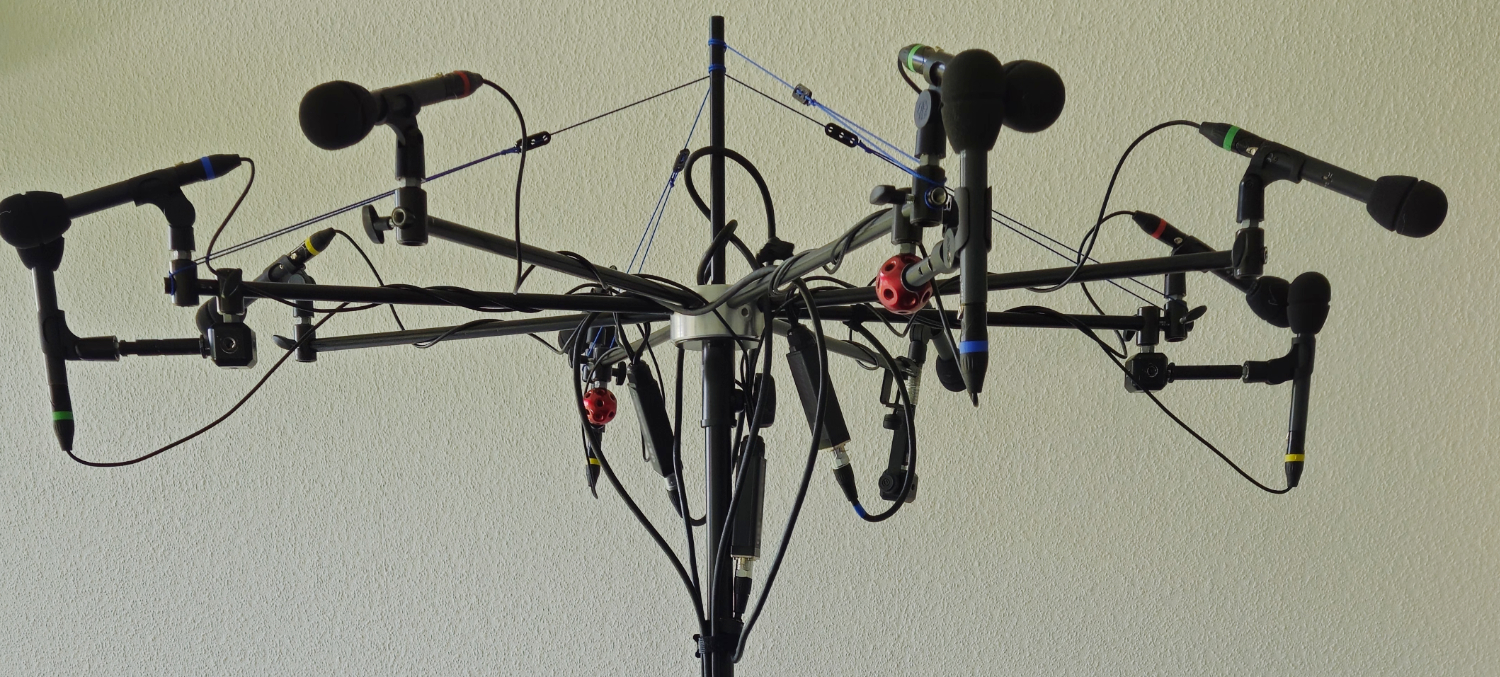
ECHO project - ESMA-3D
ECHO project - ESMA-3D Although Michael Williams published the original concept for the Equal Segment Microphone Array 3D (ESMA-3D) in 1991, Dr. Hyunkook Lee optimized this setup in 2016 using the MARRS ICTD/ICLD-based localization model and augmented it with height channels for 3D recording. But…
Continue reading...